Sometimes I run into people asking questions about basic material and texturing in Blender, and I don't really know of any extensive video tutorials on this subject. If you do, you can send along the links in the comments :) Here are some basics to get you up and running with textures and materials in Blender.
Quick Tip:
Switch between different predefined screen layouts (Default, UV Editing ect.) so you don't have to always change the layout manually. You find these at the top of your screen (ctrl-arrow keys). You can customize and add your own preset by pressing the + (plus) button.
Procedurals and Image Texture
First you need a material, so add a material to your object, then go to the texture tab.
There are two types of basic texturing UV unwrap textures which use image textures, and procedural textures which are generated inside Blender. You choose either of these in the Type drop-down menu. Most of them in the menu are procedural except for Environment Map and Image or Movie.
Procedural textures won't show in the 3d View, only image textures are supported, so if that is your goal you will need to use an image.
First select your object, go to the Material Buttons Tab and add a material, your object may have a default material on it already, give it any settings you like. Now click on the Texture Buttons tab, add a texture in a new slot or use the default texture that is already applied, change the type to an image. Don't open your image yet.
Now there are two basic Mapping Coordinates systems you need to know about: Generated and UV. Generated coordinates are used for procedural textures, but can be used for image textures. UV coordinates are used for UV unwrapped objects to display images.
Click the Mapping panel to expand it, the default Coordinates are Generated so just select the Projection drop-down menu, it shows a few options for generated coordinates. Unfortunately only the flat projection works in the 3D View, so this makes (bug?) generated coordinates not so useful in the 3D View.
Change the Coordinates to UV, now you need to have your object unwrapped. Switch to the the UV Editing screen layout preset.
UV Unwrapping your Mesh
For everyone needing a more in depth explanation of UV unwrapping, here is a video by Blender Cookie on the basics. Here is another intro on UVs from Blendtuts.com
The basic process in blender is to go into edit mode, select the edges where you want the seams, hit Ctrl-E to mark the seams. You then select the whole mesh and press U to unwrap the mesh. You should now have UV coordinates in your image editor.
Seams are marks you add so you can flatten out your mesh onto a 2D plane so you can use a 2D image to texture your object.

You need to assign an image texture to the coordinates now, go down to the header and click the New button to create a basic texture, or go to the Image menu and open and image.
 Now to make the texture use the UV coordinates you just created. Go back to your Default Scene Layout,
then in the Texture buttons tab, in the Mapping panel there is a blank Layer field, click it and choose the UVTex that you just created.
UV Unwrapping your Mesh
For everyone needing a more in depth explanation of UV unwrapping, here is a video by Blender Cookie on the basics. Here is another intro on UVs from Blendtuts.com
The basic process in blender is to go into edit mode, select the edges where you want the seams, hit Ctrl-E to mark the seams. You then select the whole mesh and press U to unwrap the mesh. You should now have UV coordinates in your image editor.
Seams are marks you add so you can flatten out your mesh onto a 2D plane so you can use a 2D image to texture your object.

You need to assign an image texture to the coordinates now, go down to the header and click the New button to create a basic texture, or go to the Image menu and open and image.
 Now to make the texture use the UV coordinates you just created. Go back to your Default Scene Layout,
then in the Texture buttons tab, in the Mapping panel there is a blank Layer field, click it and choose the UVTex that you just created.
To get image textures to show in the 3d View, you need to have the texture applied to a material.
 There are generally two ways to get your texture to show in the 3D View: with Texture Solid or GLSL.
With Texture Solid all you need to do is turn it on in the properties panel in the 3d View (hotkey N), scroll down to the Display panel and click the check box.
To use GLSL you need to change the Shading to GLSL in the Display panel and turn on textured view instead of shaded view on the 3d View header.
Note: You have to make sure you have a lamp in your scene when using GLSL or your object will appear black.
How to Display Transparency in 3D View
There are two ways to display transparency in the 3D View.
The first way does not require GLSL. First go add transparency to the object material, then go to the Object properties panel (the yellow cube icon), scroll down to the Display and turn on the Transparency. This is a per object setting and it doesn't work with Textured Solid turned on, so you need to turn it off in the 3D View if you previously turned it on.
Transparency can also be displayed with GLSL. First you need to turn on Textured Shading in the 3D View. Go to the Material properties panel and turn on the Transparency, drag the alpha slider down and you should see the results in the 3D View.
Note: some video cards such as older ATI cards don't support GLSL.
Work-flow Overview
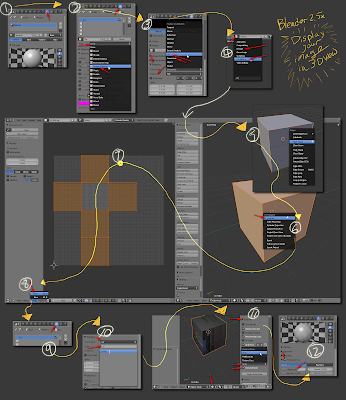
This is a quick overview work-flow to guide you through this process again, just without explanations.
This is a quick overview work-flow to guide you through this process again, just without explanations.
External Links
Here are some links to other peoples knowledge on the subject.
Very good basic video tutorials to get you started with blender 2.5x Beta
Blender Cookie Getting Started with Blender Materials
$30 training series that goes in-depth into the basics of using blender including materials and texturing.
2010 Blender Training Series
Part 5 of the Blender Underground learning blender tutorial series does a good job at covering the basics of materials in 2.4x.
Blender Undergound: Material Foundations


2 comments:
Cool! Thanks for the GLSL tips.
This is fantastic!
Post a Comment